Creating Travelers
Step-by-step guide to creating new traveler profiles with optional passport information
Creating Travelers
This guide walks through the process of creating a new traveler profile in the dashboard. You can create a traveler with just basic information or include passport details during creation.
Prerequisites
Before creating a traveler:
- You have the
travelers.createpermission - You know which user the traveler belongs to
- You have the traveler's personal information ready
Creating a New Traveler
Open the Create Form
From the Travelers list page, click the Add Traveler button in the top right corner. This opens the traveler creation drawer.
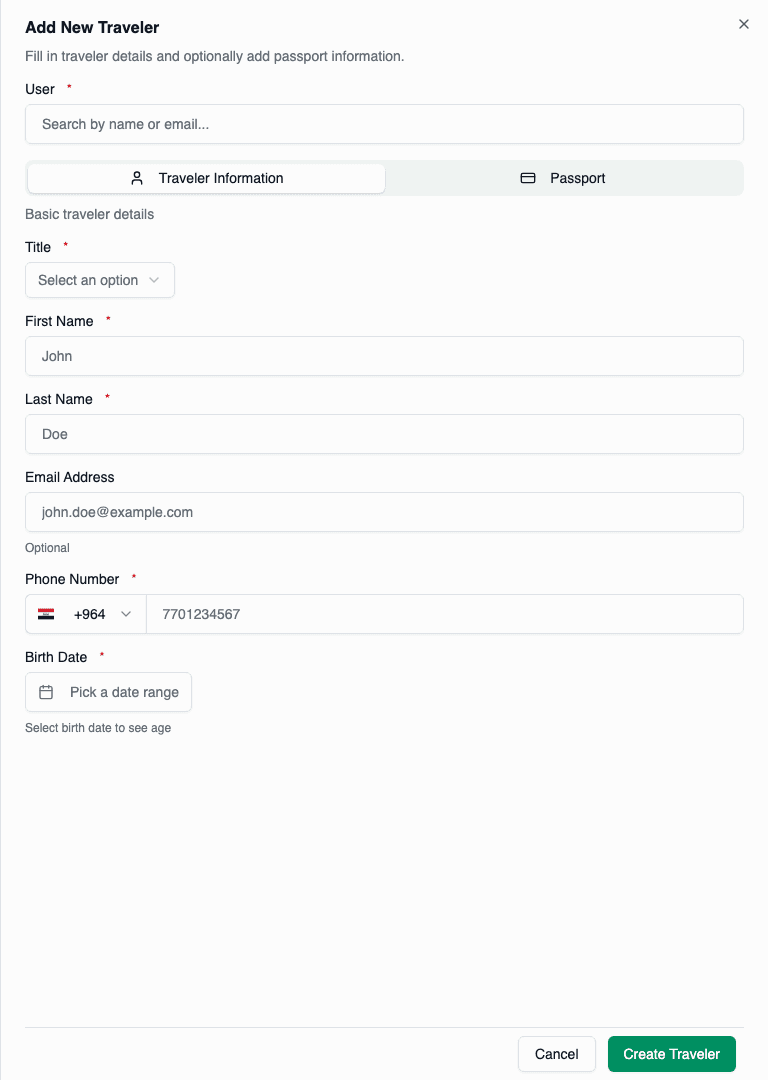
Select the User
Search for and select the user who owns this traveler profile:
- Type the user's name or email in the search field
- Select the user from the dropdown results
- The selected user cannot be changed after creation
Choose the user carefully. The user-traveler relationship is permanent and cannot be changed after creation.
Enter Traveler Information
Fill in the required traveler details:
| Field | Required | Description |
|---|---|---|
| Title | Yes | Mr., Mrs., Ms., Miss, or Master |
| First Name | Yes | As shown on passport |
| Last Name | Yes | As shown on passport |
| Email Address | No | Traveler's email (optional) |
| Phone Number | Yes | With country code |
| Birth Date | Yes | For age/type calculation |
The traveler's name should match their passport exactly for booking purposes.
Add Passport (Optional)
Switch to the Passport tab to add passport information during creation:
| Field | Required | Description |
|---|---|---|
| Passport Number | Yes* | Official passport number |
| Nationality | Yes* | Country of citizenship |
| Issuing Country | Yes* | Country that issued the passport |
| Issuing Date | Yes* | When the passport was issued |
| Expiry Date | Yes* | When the passport expires |
| Documents | No | Upload passport scans (up to 10 files) |
*Required only if adding passport information
You can skip the passport tab and add passports later from the traveler's detail page.
Save the Traveler
Click Create Traveler to save. The system will:
- Validate all required fields
- Create the traveler record
- Create the passport (if provided)
- Upload documents (if provided)
- Redirect to the new traveler's detail page
Title Options
Choose the appropriate title based on the traveler. Titles are stored in lowercase but displayed with proper capitalization:
| Title | When to Use |
|---|---|
| Mr. | Adult male |
| Mrs. | Married adult female |
| Ms. | Adult female (marital status neutral) |
| Miss | Unmarried adult female or female child |
| Master | Male child (under 12) |
The title should match how the traveler's name appears on their passport for consistency.
Age and Type Calculation
After entering the birth date, the system automatically:
- Calculates the traveler's current age
- Assigns the appropriate traveler type (Adult/Child/Infant)
- Displays the calculated type in the form
For example, a traveler born March 15, 2020 would be classified as a Child (CHD) on January 26, 2026, since they are 5 years old (birthday hasn't occurred yet in 2026).
Creating Without Passport
You can create a traveler without passport information:
- Fill in only the Traveler Information tab
- Leave the Passport tab empty
- Click Create Traveler
The traveler will be created, and you can add passports later from the detail page.
Travelers without passports cannot be used in flight bookings until passport information is added.
Creating with Passport and Documents
For complete setup during creation:
- Fill in traveler information
- Switch to Passport tab
- Enter all passport details
- Upload passport document scans:
- Click the file upload field
- Select files (JPEG, PNG, or PDF)
- Up to 10 files, max 10MB each
- Click Create Traveler
The passport will be automatically set as primary since it's the first one.
Validation Rules
The form validates:
| Field | Validation |
|---|---|
| First Name | Required, minimum 1 character |
| Last Name | Required, minimum 1 character |
| Valid email format (if provided) | |
| Phone | Valid phone number with country code |
| Birth Date | Valid date in the past |
| Passport Number | Required if adding passport |
| Expiry Date | Must be after issuing date |
Error Handling
Common errors and solutions:
| Error | Cause | Solution |
|---|---|---|
| "User is required" | No user selected | Search and select a user |
| "Passport expiry date must be after issuing date" | Invalid date range | Correct the dates |
| "Failed to upload documents" | File too large or wrong format | Use smaller files or supported formats |
After Creation
Once the traveler is created:
- View Details — Review the traveler information
- Add More Passports — If the traveler has multiple passports
- Upload Documents — Add any additional travel documents
- Include in Bookings — The traveler is now available for booking
Best Practices
- Match Passport Exactly — Use names as they appear on the passport
- Verify Birth Date — Double-check for accurate age classification
- Add Passport Early — Include passport during creation when possible
- Quality Documents — Upload clear, legible scans
- Verify Before Saving — Review all information before submitting